Database Engines:pgdbe
Setting up pgAdmin Professional
After installation of the PostgreSQL server, an entry named PostgreSQL x.y with a sub entry pgAdmin III is contained in the Start menu. A click on item pgAdmin III starts the administrative tool, whose main windows is shown below.
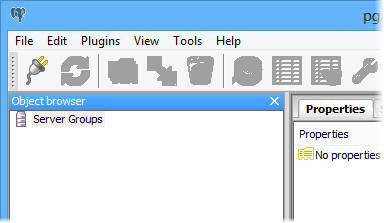
Main window of pgAdmin after first start.
Initially, no server is configured in the pgAdmin tool. Therefore, the first step is to make the PostreSQL server known to pgAdmin. This is done by using the File->Add Server menu item to open the New Server Registrationdialog. This is shown in the screenshot below.
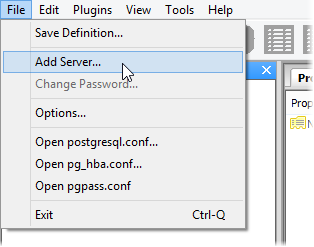
Adding a server via the File menu.
The New Server Registration dialog is used to add a new server connection to the pgAdmin tool. A name is required to distinguish the new server from other servers which may be added eventually. Assuming the PostgreSQL server is installed on the local machine - which is the regular case when developing database applications - the name could be "PostgreSQL server on my workstation". The server host must be specified as a hostname/IP address, or as the fully-qualified domain name of the physical machine on which the PostgreSQL server is installed. In our case, the PostgreSQL resides on our development machine. Therefore, "localhost" must be entered in the Host field. In most cases, the port number can be left at 5432 which is the default port of a PostgreSQL installation. If an alternate port number was specified during server installation, this port number must be entered instead. The credentials of the Postgres user which is to be used for the connection also needs to be supplied in the corresponding entry fields. It is recommend to use usernames and passwords which are simple and easy to remember for a development installation. Unless different user credentials were selected when installing the PostgreSQL server, specify "postres" as both the user name and password. For your convenience, also check the Store password option. Otherwise, the password needs to be supplied each time a connection is established to the server. An example of a filled out New Server Registration dialog can be seen in the following screenshot.
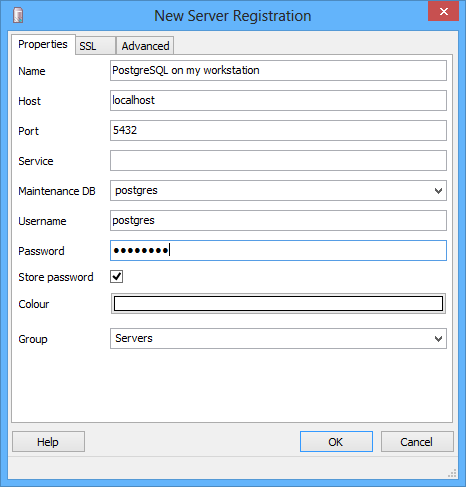
New Server Registration dialog
Once completed, click the Ok button to close the dialog. pgAdmin now attempts to connect to the PostreSQL server. After the connection is established, a new node for the server appears in the object browser as shown below.
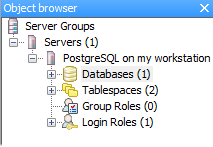
A server was registered with pgAdmin
In the event of a connection error, pgAdmin displays a message box with details about the error. Common problems include firewalls blocking access to port 5432 on the server, or a missing client IP address entry in the pg_hba.conf configuration file.
Summary
This chapter outlined the basic steps for connecting to a PostgreSQL server using the pgAdmin tool. More information about pgAdmin can be found in the online help which is accessible by pressing the F1 key.
Feedback
If you see anything in the documentation that is not correct, does not match your experience with the particular feature or requires further clarification, please use this form to report a documentation issue.