Xbase++ Workbench:xwb
Built-in features Foundation
The easiest way to get aquainted with the Source Code Editor is to explore its features while writing source code. For this, you should close all files and create a new TEST.PRG file that can be used for trying out the Source Code Editor features.
Select File -> Close All
Select File -> New and click the Source tab in the New Itemsdialog.
Double Click Xbase++ Program File
Select File -> Save As and enter TEST.PRG in the save file dialog.
Completing these instructions leaves you with a new, empty source code file in the editor. The following code snippet is used to demonstrate how the Source Code Editor supports a developer in writing source code:
01:  PROCEDURE Main()
02:     LOCAL cFirstName, cLastName
03:
04:     DbUseArea( .T., "FOXCDX", "Customer.dbf", "Cust", .T. )
05:
06:     IF .NOT. Used()
07:       QUIT
08:     ENDIF
09:
10:     cFirstName := Cust->FIRSTNAME
11:     cLastName  := Cust->LASTNAME
12:
13:     ? Trim( cFirstName ), Trim( cLastName )
14:
15:  RETURN
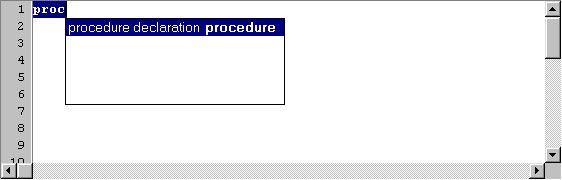
The first thing to write is the PROCEDURE declaration along with the corresponding RETURN statement. You can type this all by yourself, or let the Source Code Editor know what you want to type and let it complete the code for you. Just type the four letters proc and press Ctrl+J. This instructs the Source Code Editor to present a list of matching code templates where you choose the desired template from. In case of proc, there is only one code template pre-defined:
ItelliCode template
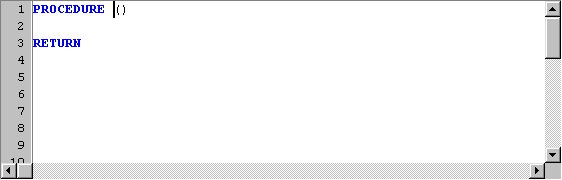
When you press Enter, the Source Code Editor completes the PROCEDURE declaration, adds the RETURN statement and places the cursor in front of an opening and closing bracket. This is the place where the symbolic name of the procedure must be written, i.e. you have to type Mainat this place.
Completed template
Note that the Source Code Editor has completed the template in upper case letters, although the initial proc is written in lower case letters. Whether or not to display keywords in upper case letters depends on a configuration switch of the editor (Tools-> Editor options-> IntelliCode-> Keywords in uppercase).
The declaration of variables follows next to the procedure declaration. This is something you have to type all by yourself, i.e. the LOCAL declaration in line #2 of the code snippet plus the symbolic names of the variables must be typed by you.
The next line contains a function call to open a database: DbUseArea(). This function is known by the Source Code Editor as are all other Xbase++ functions. Therefore, you don't need to type the entire function name. When you type the first three letters and press Ctrl+Space, a list of function names is presented that begin with these three letters. Then you only need to select the desired function and press Enter.
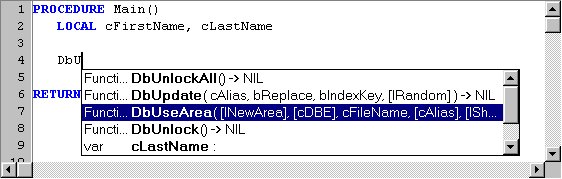
"DbU" function names
The Source Code Editor completes the function name in your code with the selected name. It also supports you in writing the correct function call by presenting the function prototype when you type the opening bracket. The opening bracket indicates that the symbolic name of the function is complete and ready to be looked up. If the function name is found, the function prototype is displayed.
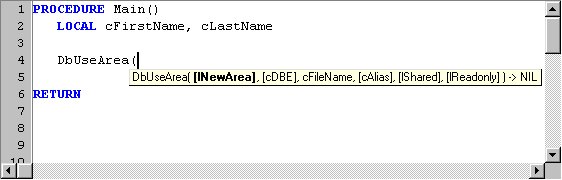
IntelliHelp tool-tip
The IntelliHelp tool-tip remains visible until the closing bracket is typed. Alternatively, the Esc key closes the tool-tip. While you are typing the values for the function parameters, the name of the parameter whose value must be specified is highlighted.
If the meaning of a parameter is not clear, or if you don't know a default, you have to look-up the function description in the online help. This is easily accomplished by positioning the cursor in the function name and pressing the F1 key. When the cursor is located within a symbolic name or text, this text is searched for in the index of the online help. If the text is found in the index, the corresponding help topic is automatically displayed. When it is not found, a default help page is presented.
Line #6 of the code snippet contains an IF statement, for which two templates exist. Just type if press Ctrl+J and select the statement without the ELSE clause.
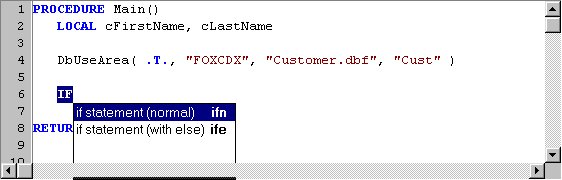
Two IF templates
The complete shortcuts for the two IF statements are ifn and ife. When you type a complete shortcut, the template is inserted into your code by pressing Ctrl+J without the template list being presented. Once you become familiar with the template mechanism you will notice how convenient it is to type ife Ctrl+J for a complete IF..ELSE..ENDIF structure.
The next line of the code snippet assigns the value of a database field to a LOCAL variable. The symbolic name cFirstName is known to the editor so that you do not need to type it. Press Ctrl+Space to see a list of symbolic names you can choose from.
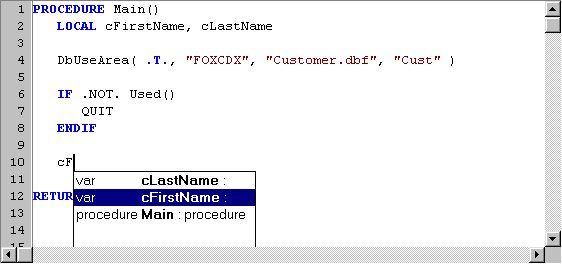
Code completion
When you type cF in the editor and press Ctrl+Space, the Source Code Editor highlights the item in the list that matches best with the text at the cursor. Pressing Enter in the list replaces the text at the cursor with the selected item. This way, the code you have started to write is completed with a symbol known by the editor. The code completion feature allows you to use long and meaningful variable names and relieves you from typing long names more than once.
Another form of code completion is very convenient for implementing CLASS code. Just delete the code snippet completely from TEST.PRG and write a simple CLASS declaration. An example is given below.
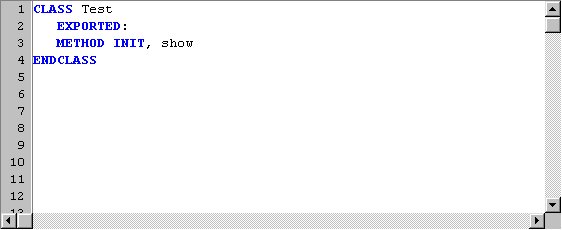
Valid CLASS declaration
This is a very simple CLASS declaration containing two METHOD declarations. The methods are to be implemented after the ENDLCASS statement. Since the Source Code Editor knows the METHOD declarations, you can have it write the METHOD implementation templates for you:
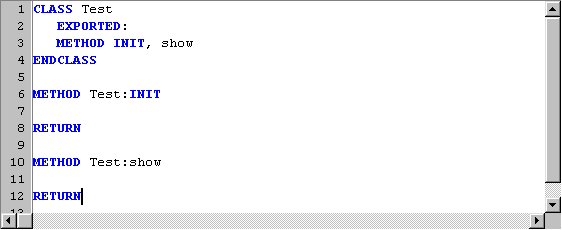
METHOD bodies completed
Just place the cursor between CLASS and ENDCLASS and press Ctrl+Shift+C. The Editor completes your code with the METHOD bodies required for the implementation of all methods. This ensures that all declared methods become implemented.
Note that Ctrl+Shift+C can also be used to make sure that all implemented methods are declared. Just add a method to the Test class, e.g:
METHOD Test:hide

RETURN
When you press Ctrl+Shift+C, the Source Code Editor adds the METHOD declaration to the CLASS declaration.
Feedback
If you see anything in the documentation that is not correct, does not match your experience with the particular feature or requires further clarification, please use this form to report a documentation issue.