Programming Guide:xppguide
Applications in graphics mode (GUI mode) Foundation
This section describes the concepts that are important when programming with Xbase Parts and developing GUI applications. It starts with an overview of Xbase Parts and how events are processed by code blocks or callback methods. The XbpCrt() and XbpDialog() classes that provide objects for managing the application window of an Xbase++ program are then detailed. XbpCrt windows are suitable for porting existing DOS programs to a graphic user interface and allow simultaneous text based and graphic output. These windows are used in hybrid applications that transition existing DOS programs to GUI applications in a series of steps. Only graphic output can occur in XbpDialog windows which are thus used only in GUI applications.
Basics of Xbase Parts
Programming graphical user interfaces for applications is easily performed using the Xbase++ object model and system resources available on the Xbase++ language level. Through its "Xbase Parts" (XBPs), Xbase++ offers ways for the programmer still thinking in procedural terms to create programs with graphical user interfaces. Xbase Parts provide graphic dialog elements, like pushbuttons and checkboxes, that can be integrated into character based applications as well as into pure graphic applications. All Xbase Parts are based on operating system resources and fit into the event driven design of the operating system. In order to use Xbase Parts the program must be linked for GUI mode. All Xbase Parts use the same basic mechanisms which are described in this section.
What are Xbase Parts?
XBPs are objects that provide the complex mechanisms of the operating system on the Xbase++ language level. A distinction can be made between Xbase Parts (XBPs) designed for screen interaction with the user and those that are used only for graphic output or are not visible. The second group of XBPs is described in the chapter "The Xbase++ Graphics Engine (GRA)" and is not discussed in this chapter. The XBPs for user interaction each provide a single dialog element as a graphic component. For this reason, XBPs can only be used in a program that is linked for the GUI mode. In Xbase++, there are Xbase Parts for windows, pushbuttons, checkboxes, data entry fields, etc., as well as standard dialogs for such tasks as selecting fonts or files.
The life cycle of Xbase-Parts
All XBPs are subject to what is called the "life cycle", which distinguishes them from other objects like TBrowse objects or Thread objects. All objects, including XBP objects are created from their class object using the method :new(). However, if the object is an XBP object it is not yet capable of doing anything except requesting system resources from the operating system. This is done using the method :create(). An XBP is operational only after execution of the :create() method. The following program code is an example of this process for a pushbutton:
// create object for XBP and specify coordinates
oButton := XbpPushButton():new( , , {10,20}, {80,30} )

// define variables for configuring system resources: in this
// case the text which is displayed on the pushbutton
oButton:caption := " Delete "

// request system resource
oButton:create()
These lines show the basic process for creating an operational XBP. The object is first created using the class method :new(). Then values are assigned to the instance variables used to configure the system resource, and finally :create() is used to request the system resource from the operating system (in this case, a pushbutton). It is important to distinguish between :new() and :create(). Both methods must be called to generate an operational Xbase Part. The :new() method generates the object and the :create() method requests system resources. Most XBPs use instance variables only to configure the system resource. Assigning values to instance variables used for configuration must occur before the :create() method is called.
The system resource can be reconfigured after an XBP is created and has requested the system resource from the operating system. If new values are assigned to the instance variables used for configuration of the system resource, the method :configure() must be called to implement the changes. The following shows an example:
// reconfigure a loaded system resource
oButton:caption := " Recall "
oButton:configure()
The text (or caption) displayed on the pushbutton is part of the "pushbutton" system resource. In order to change it, the system resource must be reconfigured. The XBP method :configure() is used to accomplish this (and is one of the "life cycle" methods of an XBP).
The last method in the "life cycle" of an XBP is :destroy(). This method releases the system resources that were requested from the operating system by the method :create(). This renders the XBP non-operational but it remains in existence and can request system resources again. In other words, the method :destroy() has no influence on the object created using :new(), but releases the system resources requested using :create(). The following diagram illustrates the "life cycle" of an Xbase Part and clarifies when each of the methods are called:
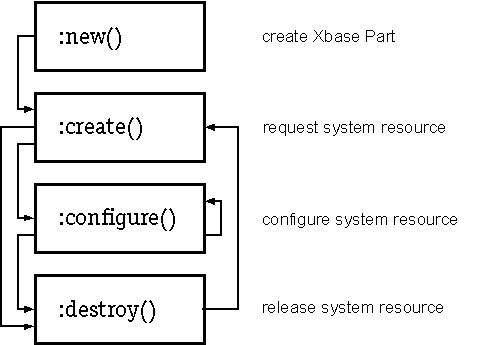
The method :destroy() is generally not needed. However, it can be used to explicitly release memory intensive system resources (for example, bitmaps). System resources are implicitly released as soon as there are no further references to the Xbase Part object. In this case, an Xbase Part is handled like any other memory variable and is removed from memory by the garbage collector.
Xbase Parts and events
XBPs are seamlessly inserted into the message stream used to control a GUI application. Messages identify the events that have taken place. Examples of events that a program would receive are keyboard entry and mouse clicks. Events such as these are read using the function AppEvent(), which returns a numeric event code (see "Keyboard and mouse" in the section "Applications in character mode" of this chapter). The function AppEvent() plays a central role in controlling the Xbase Parts that provide graphic dialog elements. The following program code shows the basic relationship:
#include "Appevent.ch"

PROCEDURE Main
   LOCAL nEvent, mp1, mp2, oXbp

   // create first pushbutton
   oXbp:= XbpPushButton():new()
   oXbp:caption := "A"
   oXbp:create( , , {10,20}, {100,40} )
   oXbp:activate := {|| QOut( "Pushbutton A" ) }

   // create second pushbutton
   oXbp := XbpPushButton():new()
   oXbp:caption := "B"
   oXbp:create( , , {150,20}, {100,40} )
   oXbp:activate := {|| QOut( "Pushbutton B" ) }

   // Event loop
   nEvent := 0
   DO WHILE nEvent <> xbeP_Close
      nEvent := AppEvent( @mp1, @mp2, @oXbp )
      oXbp:HandleEvent( nEvent, mp1, mp2 )
   ENDDO
RETURN
In this example, two pushbuttons are created and the entire program control lies within a single DO WHILE loop (the event loop). In this event loop, events are read from the event queue using AppEvent(). The third parameter passed by reference to the function is assigned a reference to the addressee for the event. The addressee might be the window or one of the pushbuttons. The event is processed in the :handleEvent() method of this addressee object. Each pushbutton has an "activate" code block that is automatically executed within the :handleEvent() method when a pushbutton is clicked with the mouse. Within these code blocks a character is output on the screen using QOut(). The following illustration shows what the output on the screen might look like if each of the two pushbuttons were clicked several times:
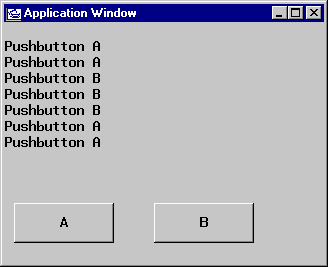
Output from the example program
An important point shown in the example program is that the function AppEvent() in the event loop not only reads the event from the event queue, but also determines the addressee for the event. The addressee is always an Xbase Part and each XBP includes the method :handleEvent(). Three parameters are always passed by reference to the :handleEvent() method: the numeric event code and the two message parameters. When the message is processed within the :handleEvent() method, the code block stored in the :activateinstance variable of the pushbutton is executed. This code block contains the XBP's reaction to the specific event. When the left mouse button is clicked on a pushbutton, the xbeP_Activate event is generated and the numeric event code (corresponding to a #define constant) is returned by AppEvent(). When this numeric code is passed on to :handleEvent(), the method executes the code block contained in the instance variable :activate.
For each XBP there are many instance variables that can contain code blocks that are executed in response to specific events. The event is first read from the event queue using AppEvent(). Then the reaction occurs when the code block provided for the event is executed. This sequence of events is called a "callback" approach. For this reason, all instance variables that contain code blocks defining reactions to events are referred to as "callback slots". A callback slot contains either the value NIL or a code block to be executed by the :handleEvent()method when the specific event occurs. The following tables list the #define constants of predefined events for user interaction and the corresponding callback slots available for all XBPs:
Default events which are processed by Xbase Parts - Mouse events
| Event code | Callback slot | Description |
|---|---|---|
| xbeM_LbClick | :LbClick | Click left button |
| xbeM_LbDblClick | :LbDblClick | Double click left button |
| xbeM_LbDown | :LbDown | Left button pressed |
| xbeM_LbUp | :LbUp | Left button released |
| xbeM_MbClick | :MbClick | Click middle button |
| xbeM_MbDblClick | :MbDblClick | Double click middle button |
| xbeM_MbDown | :MbDown | Middle button pressed |
| xbeM_MbUp | :MbUp | Middle button released |
| xbeM_Motion | :Motion | Mouse moved |
| xbeM_RbClick | :RbClick | Click right button |
| xbeM_RbDblClick | :RbDblClick | Double click right button |
| xbeM_RbDown | :RbDown | Right button pressed |
| xbeM_RbUp | :RbUp | Right button released |
Default events which are processed by Xbase Parts - Other events
| Event code | Callback slot | Description |
|---|---|---|
| xbeP_Keyboard | :Keyboard | Keyboard entry occurred |
| xbeP_HelpRequest | :HelpRequest | Help requested |
| xbeP_SetInputFocus | :SetInputFocus | Input focus granted |
| xbeP_KillInputFocus | :KillInputFocus | Input focus lost |
| xbeP_Move | :Move | XBP moved |
| xbeP_Paint | :Paint | XBP redrawn |
| xbeP_Quit | :Quit | Application terminated |
| xbeP_Resize | :Resize | Size of XBP changed |
The callback slots in this table are included in all XBPs and allow user interaction by processing events. Many XBPs have additional callback slots for events that only occur with specific XBPs. For example, pushbuttons have the :activate callback slot, that can contain a code block to execute in response to the xbeP_Activate event. This callback slot is not present in other XBPs.
In summary, the example program above shows the basic process for programming using Xbase Parts. An XBP is created and receives the "knowledge" of how it should react to events through the code blocks that are assigned to the callback slots. The :handleEvent() method processes events and executes the corresponding code block. The program is controlled in the event loop where events are read using AppEvent(). This function also determines which Xbase Part is to process each event. In the end, the application is controlled entirely by the user who generates the events.
Callback methods for processing events
The preceding section presents the basic approach to processing events with XBPs and describes the simple model where the reaction to an event is defined by a code block assigned to one of the predefined callback slots. Xbase++ also offers a second model. Although this model is more complicated, it has broader capabilities for processing events. This approach utilizes callback methods. Along with each callback slot, Xbase Parts contains a callback method of the same name that is executed instead of the code block contained in the callback slot. Like the callback code block, the corresponding callback method is also executed by the method :handleEvent() for each event it receives. Callback methods within the predefined XBPs do not execute any code. They are available for user-defined XBPs where the reaction to an event is programmed as a method rather than as a code block. The following example program demonstrates this approach. Its effect is the same as the example in the previous section and it displays the same results on the screen:
#include "Appevent.ch"

PROCEDURE Main
   LOCAL nEvent, mp1, mp2, oXbp
   SetColor("N/W")
   CLS

   // create user-defined pushbuttons
   MyPushButton():new( "A", { 10,20}, {100,40} ):create()
   MyPushButton():new( "B", {150,20}, {100,40} ):create()

   // Event loop
   nEvent := 0
   DO WHILE nEvent <> xbeP_Close
      nEvent := AppEvent( @mp1, @mp2, @oXbp )
      oXbp:HandleEvent( nEvent, mp1, mp2 )
   ENDDO
RETURN

// user-defined pushbutton
CLASS MyPushbutton FROM XbpPushbutton
   EXPORTED:
   METHOD init, activate
ENDCLASS

// initialize superclass and self
METHOD MyPushbutton:init( cCaption, aPos, aSize )
   ::XbpPushButton:init(,, aPos, aSize )
   ::caption := cCaption
RETURN self

// callback method for the event xbeP_Activate
METHOD MyPushbutton:activate
   QOut( "Pushbutton ", ::caption )
RETURN self
This program differs from the example in the previous section in a couple of ways. The Main procedure is abbreviated and the MyPushButton class is instantiated instead of the XbpPushButton class. The method :activate() has been redefined in the user-defined class MyPushButton to produce output using QOut(). In the previous example, the output was programmed within callback code blocks. The role of the callback code blocks in the previous example is replaced by the callback method :activate() in this example. The method :activate() is then executed when the left mouse button is clicked on either one of the two pushbuttons. Callback methods are used to process events in user-defined Xbase Parts that are inherited from existing XBPs. They generally replace the code in callback code blocks and require that the new class be derived from an existing Xbase Part. The callback method of the new class contains the program code that is executed when a specific event occurs. When a callback method is defined, a code block generally should not also be assigned to the callback slot of the same name, since it would then be executed after the callback method.
Instance variables and methods existing in all Xbase Parts
All Xbase Parts, even those that do not process events or have a visual representation, include the instance variable :cargo. This instance variable is not used by any Xbase Part but allows user-defined data to be contained in the XBP without requiring that a new class be created.
XBPS also include the :status() method, which returns the current condition of an XBP in its life cycle. This method returns a numeric value corresponding to a #define constant from the XBP.CH file. The possible return values are listed in the following table:
Constants for the return value of :status()
| Constant | Description |
|---|---|
| XBP_STAT_INIT | Xbase Part initialized |
| XBP_STAT_CREATE | System resources request successful |
| XBP_STAT_FAILURE | System resources could not be provided |
The method :status() is mainly useful for debugging purposes. It can be called after the method :create() to determine whether the system resources were provided for an Xbase Part.
Windows and relationships
All output in a GUI application occurs in a window on the screen. The general meaning of the term "window" is a rectangular screen area containing a graphic display. The application window visible on the screen actually consists of a frame and a number of additional windows. All Xbase Parts that have a visible representation are windows in the sense of this broader definition.
The program itself runs in an application window which limits the area that an application uses on the screen. The application window contains dialog elements (Xbase Parts) that also represent windows. Each GUI application is made up of many windows. A hierarchical relationship exists between these windows and is described using the terms "parent" and "child". A parent window provides the display area for child windows and child windows are contained in the parent window.
The parent-child relationship between windows represents a physical relationship and is the most important relationship in programming using Xbase Parts. Returning to the example from the previous section, the pushbuttons are children of the application window and are contained in it. Viewed from the other direction, the application window is the parent of the two pushbuttons and contains the Xbase Parts. This relationship is very significant in processing keyboard events. Whenever a child XBP receives a key that it is not able to process or does not understand, the event is sent on to the parent for processing. A modification of the example in the previous section illustrates this relationship:
#include "Appevent.ch"

PROCEDURE Main
   LOCAL nEvent, mp1, mp2, oXbp
   SetColor("N/W")
   CLS

   // get application window
   oXbp := SetAppWindow()

   // display character corresponding to key pressed
   oXbp:KeyBoard := {|mp1| QQOut( Chr(mp1) ) }

   // create user-defined pushbuttons
   MyPushButton():new( "A", { 10,20}, {100,40} ):create()
   MyPushButton():new( "B", {150,20}, {100,40} ):create()

   // Event loop
   nEvent := 0
   DO WHILE nEvent <> xbeP_Close
      nEvent := AppEvent( @mp1, @mp2, @oXbp )
      oXbp:HandleEvent( nEvent, mp1, mp2 )
   ENDDO
RETURN
In this example, the application window is determined using the function SetAppWindow(). The application window is assigned a callback code block for the event xbeP_Keyboard. Any keys that the pushbuttons cannot process are output as characters in the window. The display on the screen might appear as follows:
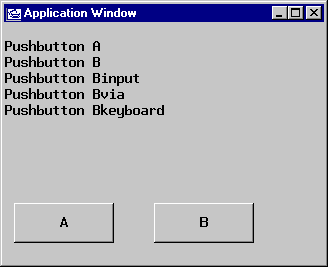
Display of example program
Pushbutton "B" has input focus. A pushbutton processes the space bar itself and is activated by this key. In the example the string "Input via keyboard" was entered and only the blank spaces were recognized by the pushbutton. Any other characters input from the keyboard are not understood by the pushbutton, and are instead processed by the parent of the pushbutton. The callback code block assigned to the :keyBoard instance variable in the application window uses QQOut() to display the keyboard character that was pressed.
The child list
Relations between windows, or Xbase Parts, respectively, are managed by the XbpPartHandler class. It is the root class for all XBPs having a visual representation. When an XBP executes the :create()method, the object is automatically added to an internal array of its parent window: the child list. The child list references all XBPs contained in a window.
Therefore, in a program it is sufficient to assign the reference of the application window to a variable in order to be able to access all contained XBPs. These are added to the child list array in the same order as they execute the :create() method. If the creation order is known an XBP can be retrieved using a numeric index. For example:
oButton := oXbp:childList()[2]
? oButton:caption                  // result: B
In the example program, the pushbutton "B" is created second. It is referenced in the second element of the child list array of the application window.
Overlapping XBPs
On the one hand, the creation order of XBPs determines their position in a parent window's child list. On the other hand, it determines the order of display. The XBP which executes its :create() method first is displayed first, too. The one created last is displayed last. Therefore, it appears in front of all other XBPs. This aspect becomes important when XBPs have the same positions in a window or are overlapping each other. This is the case when XBPs are grouped visually by a surrounding frame. For instance, if single line entry fields (XbpSLE) are to be grouped by a static frame (XbpStatic), the frame must be created first and then the entry fields are to be positioned inside the frame.
Additional information about the relationships between windows can be found in the reference documentation for this class. At this point, two Xbase Parts which may be used as the first or highest parent in the parent-child hierarchy of a GUI application need to be described first. These provide the application window. The application window manages the area on the screen where all output of a PM application occurs and where all other Xbase Parts are displayed (an exception is MDI applications which can have several application windows). The application window for a GUI application is created in the function AppSys() when the Xbase++ program starts. The source code for AppSys() is contained in the file ..\SOURCE\SYS\APPSYS.PRG. A window of the XbpCrt class is generated by default and allows both text-based and graphic output. However, the function AppSys() can be modified so that the application window is provided as an object of the XbpDialog class. In this case, only graphic output is possible.
XbpCrt() - The window for hybrid mode
The default application window used by a GUI application is an XbpCrt window. This type of window is a hybrid between text mode (VIO mode) and graphics mode. It was created for Xbase++ to allow a seamless migration from DOS applications (Clipper programs) to a 32bit operating system with graphic user interface. Within an XbpCrt window, data can be output using pure text oriented functions like DispOut() or QOut() as well as pure graphic output using functions of the GRA engine. An XbpCrt window combines the text mode capabilities of a VIO application with the graphics mode capabilities of a GUI application. This combined form is called "hybrid mode", and allows stepwise porting of existing DOS text mode applications into 32bit GUI applications.
An XbpCrt window allows graphic and text oriented output. Also, Xbase Parts can be displayed in XbpCrt windows so that a program originally developed under DOS can be transitioned step by step into a GUI application. Special adaptations for processing events are not required, since an XbpCrt window performs these tasks independently. As an example, consider a simple program created using a purely procedural approach that implements data entry using a series of Get objects. The current record is changed during input via the F6 and F7 function keys:
#include "Inkey.ch"

PROCEDURE Main

   SetColor( "N/W,W+/N" )
   CLS
   @ MaxRow()-1, 2 SAY "<F6>-Next  <F7>-Previous"

   SetKey( K_F6, {|| DbSkip( 1), RefreshGetList() } )
   SetKey( K_F7, {|| DbSkip(-1), RefreshGetList() } )

   USE Customer EXCLUSIVE

   DO WHILE LastKey() <> K_ESC
      @ 3,1 SAY "First Name:" GET Customer->FIRSTNAME
      @ 5,1 SAY "Last Name :" GET Customer->LASTNAME
      READ
   ENDDO
RETURN

PROCEDURE RefreshGetList
   AEval( GetList, {|oGet| oGet:reset() , ;
                           oGet:display() } )
RETURN
The program logic for changing records is implemented via code blocks that are associated with function keys using SetKey(). The function keys that are linked to code blocks are ideal candidates for replacement with pushbuttons in a hybrid mode application. This would help give the text mode application a more GUI look. Pushbuttons are easily added to the XbpCrt window. The two pushbuttons just need to be created in the Main procedure and replace the function SetKey():
#include "Inkey.ch"

PROCEDURE Main
   LOCAL oXbp
   SetColor( "N/W,W+/N" )
   CLS

   SetMouse(.T.)
   oXbp:= XbpPushButton():new()
   oXbp:caption := "Next"
   oXbp:activate:= {|| DbSkip( 1), RefreshGetList() }
   oXbp:create( ,, {10,10}, {90,30})

   oXbp:= XbpPushButton():new()
   oXbp:caption := "Previous"
   oXbp:activate:= {|| DbSkip(-1), RefreshGetList() }
   oXbp:create( ,, {110,10}, {90,30})

   USE Customer EXCLUSIVE

   DO WHILE LastKey() <> K_ESC
      @ 3,1 SAY "First Name:" GET Customer->FIRSTNAME
      @ 5,1 SAY "Last Name :" GET Customer->LASTNAME
      READ
   ENDDO
RETURN
The result of this change in the example program is shown in the next illustration:
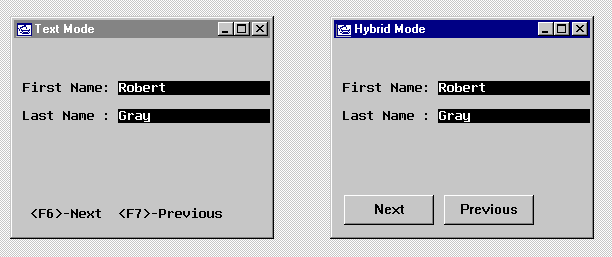
Migration from text mode to a hybrid application
There are a couple of important points in these two examples. First, only control of database movement is handled by objects of the XbpPushButton() class. The actual logic of the data input screen is not changed and the program still appears to be procedural. It is now somewhat more event driven, but only the task of handling pushbutton events is assumed by the XbpCrt window. The call to the function SetMouse(.T.) at the start of the second example causes the Get entry fields to react to mouse events. This means that within the Get system events are retrieved using AppEvent() instead of the compatibility function Inkey(). This process offers a very easy way to port existing DOS applications into a GUI environment in a stepwise manner. As another example, all @...PROMPT / MENU TO commands for program control are easily transitioned to a menu system with a main menu appearing as a menu bar at the top of the XbpCrt window.
The modified program shows another characteristic of an XbpCrt window: text mode row and column coordinates with an origin in the upper left corner of the window can be used as well as graphic xy coordinates with the origin at the bottom left (the pushbuttons are positioned in the window based on xy coordinates). Within an XbpCrt window dialog functions like AChoice() or MemoEdit() can be used and their output can be displayed next to graphic output such as Xbase Parts, bitmaps or a bar chart. The XbpCrt window also supports the text mode color system along with graphics mode colors which means that colors can be set using SetColor() or GraSetColor().
Since an XbpCrt window also allows text oriented output, its maximum size is limited to the function values of MaxRow() and MaxCol(). The default window size is 25 text lines and 80 columns corresponding to the size of a text screen. On the OS/2 platform, the size of the screen can be reduced using the mouse, but it cannot be made larger than MaxRow() and MaxCol(). This is not possible on the Windows platfroms. However, the size of a text mode window can be set when creating an XbpCrt window to any number of rows and columns desired.
In summary, all commands and functions in the scope of the Clipper language and the additional functionality of Xbase++ and Xbase Parts can be used in an XbpCrt window. An XbpCrt window is created for the exclusive purpose of allowing an easy way to port existing DOS applications to the GUI environment. This has the advantage of allowing the seamless migration of existing text mode applications to GUI. The disadvantage of this approach is the increased memory requirement of an XbpCrt window as opposed to a dialog window that does not allow text based output. The increased memory requirement of an XbpCrt window is inevitably paid for in a loss of performance. For this reason, it is recommended that new development of applications under Xbase++ not use the XbpCrt window. This is accomplished by modifying the function AppSys() in APPSYS.PRG to create an object of the XbpDialog() class as the application window.
XbpDialog() - The window for GUI mode
The class XbpDialog() provides an application window for pure graphic mode. Text based output is not possible in these dialog windows. This means that all output commands and functions that perform text based screen output under Clipper can no longer be used. Screen output occurs in a dialog window using only Xbase Parts and the functions of the GRA engine. XbpDialog objects are used to program pure GUI applications that are optimized for the operating system and use most of its capabilities.
Before continuing the discussion of the XbpDialog object, it is worthwhile to clarify which functions and commands are no longer available. The commands and functions listed in the following table can not be used if the current window is an XbpDialog object:
Commands and functions that cannot be used in dialog windows
| Commands | Functions | ||
|---|---|---|---|
| ? | ?? | SET CURSOR | AChoice() | QOut() | QQOut() |
| @...BOX | SET DELIMITERS | Alert() | Read...() |
| @...CLEAR | SET INTENSITY | Browse() | RestScreen() |
| @...GET | SET MESSAGE | Col() | Row() |
| @...PROMPT | SET SCOREBOARD | ColorSelect() | SaveScreen() |
| @...SAY | SET WRAP | DbEdit() | Scroll() |
| @...TO | TEXT | DevOut() | SetBlink() |
| ACCEPT | TYPE | DevOutPict() | SetColor() |
| CLEAR ALL | WAIT | DevPos() | SetCursor() |
| CLEAR GETS | DispBegin() | SetMode() | |
| CLEAR SCREEN | DispCount() | SetMouse() | |
| DISPLAY | DispEnd() | SetPos() | |
| INPUT | DispOut() | TBApplyKey() | |
| LIST | DispOutAt() | TBColumn() | |
| MENU TO | Get() | TBColumnNew() | |
| READ | Get...() | TBHandleEvent() | |
| RESTORE SCREEN | GetNew() | TBrowse() | |
| SAVE SCREEN | MaxCol() | TBrowseDb() | |
| SET COLOR | MaxRow() | TBrowseNew() | |
| SET CONSOLE | MemoEdit() | TBtoMousePos() |
All of the commands and functions affecting the cursor are no longer available, since the cursor as it is used in text mode does not exist in graphics mode. Similarly, the commands and functions that manipulate the text mode screen (such as SaveScreen(), DispBegin(), Scroll() and RESTORE SCREEN) cannot be used in a dialog window which operates in graphics mode. Xbase Parts and functions of the GRA engine are used in place of these text based output functions and commands.
Along with these commands and functions there are two other small groups of functions. The first represents compatibility functions that should no longer be used. The second group of functions only operate if the printer has been set as the output device using the command SET DEVICE TO PRINTER. The following table gives an overview:
Commands and functions which are not to be used in dialog windows
| Command/Function | Only usable with SET DEVICE TO PRINTER |
|---|---|
| SET KEY | DevOut() |
| Inkey() | DevOutPict() |
| SetKey() | DevPos() |
| LastKey() | PRow() |
| NextKey() | PCol() |
| IsPrinter() |
In order for the application window to be provided as a graphics dialog window, an XbpDialog object needs to be created in the function AppSys(). This function is normally executed prior to the call of the MAIN procedure. The default source code for AppSys() appears in the APPSYS.PRG file, but it can be included in another file if it is linked to the executable file. The following lines are taken from the example program SDIDEMO.PRG (the example is shortened) and give an example of modifications made to AppSys():
********************************************************************
* Example for AppSys() in an SDI application
* The function is executed prior to Main()
********************************************************************
PROCEDURE AppSys
   LOCAL oDlg, oXbp, aPos[2], aSize, nHeight:=400, nWidth := 615

   // Get size of desktop window
   // to center the application window
   aSize    := SetAppWindow():currentSize()
   aPos[1]  := Int( (aSize[1]-nWidth ) / 2 )
   aPos[2]  := Int( (aSize[2]-nHeight) / 2 )

   // Create application window
   oDlg := XbpDialog():new()
   oDlg:title := "Toys & Fun Inc. [Xbase++ - SDI Demo]"
   oDlg:border:= XBPDLG_THINBORDER
   oDlg:create( ,, aPos, {nWidth, nHeight},, .F. )

   // Set background color for drawing area
   oDlg:drawingArea:SetColorBG( GRA_CLR_PALEGRAY )

   // Select font
   oDlg:drawingArea:SetFontCompoundName( "8.Helv.normal" )

   // Display application window and set focus to it
   oDlg:show()
   SetAppWindow( oDlg )
   SetAppFocus ( oDlg )

RETURN
In this procedure, a reference to the desktop window is returned by the function SetAppWindow() and is used to determine its size. This allows the Xbase++ application window to be centered on the screen when opened, regardless of the screen resolution. The dialog window created in the example has a fixed size, because the box type XBPDLG_THINBORDER does not allow the user to change the size of the window. This is the simplest variation, since changing the size of the application window also involves repositioning or redimensioning the dialog elements (XBPs) contained in the window.
After the dialog window has been created, it is recommended that the background color for the drawing area be set. This also sets the background color for text displayed as captions for XBPs such as XbpStatic, XbpRadioButton or XbpCheckBox. The method :setColorBG()returns the color of the drawing area and sets the default color used for displaying all XBPs with captions.
The drawing area of XbpDialog
The background color is set using the method :setColorBG(). This method is not executed by the XbpDialog object in the example, but by an object contained in the instance variable :drawingArea. This is because the XbpDialog objects contain additional objects of the XbpIWindow class. Objects of this class provide implicit windows that do not have a title bar or a frame, but that manage rectangular screen areas. An XbpDialog object basically consists of a frame that limits the screen area which is available for an application. The title bar of the dialog window as it appears on the screen is a window, as is the drawing area within the dialog. Both these windows are implicit windows of the XbpDialog object. They are objects of the XbpIWindow class and are contained in the instance variables :titleBarArea and :drawingArea. The drawing area of the XbpDialog object plays an important role when programming with dialog windows.
For example, if a pushbutton is to be displayed in a dialog window, it must be a child of the drawing area (:drawingArea) of the XbpDialog object. This is a difference between how a dialog window works and an XbpCrt window which can itself act as parent. An XbpDialog object is the parent of only the two implicit windows that manage the drawing area and the title bar. Both of these windows are accessible through instance variables of the XbpDialog object. An example of displaying a pushbutton in a dialog window is shown in the following program code:
#include "Appevent.ch"

PROCEDURE Main
   LOCAL nEvent, mp1, mp2, oXbp

   // Create pushbutton
   oXbp:= XbpPushButton():new( SetAppWindow():drawingArea )
   oXbp:caption := "Cancel"
   oXbp:create( , , {10,20}, {100,40} )
   oXbp:activate := {|| PostAppEvent( xbeP_Close) }

   // Event loop
   nEvent := 0
   DO WHILE nEvent <> xbeP_Close
      nEvent := AppEvent( @mp1, @mp2, @oXbp )
      oXbp:HandleEvent( nEvent, mp1, mp2 )
   ENDDO
RETURN
Here the parent for the pushbutton is specified in the call to a method. The function SetAppWindow() returns the XbpDialog object created in AppSys() and a reference to its drawing area is passed to the pushbutton method :new(). If the drawing area is not specified as the parent for Xbase Parts, it inevitably leads to an error in the display or no display at all within the dialog window. It is important to remember that with XbpDialog objects the drawing area (oXbpDialog:drawingArea) must be set as the parent, not the XbpDialog object itself.
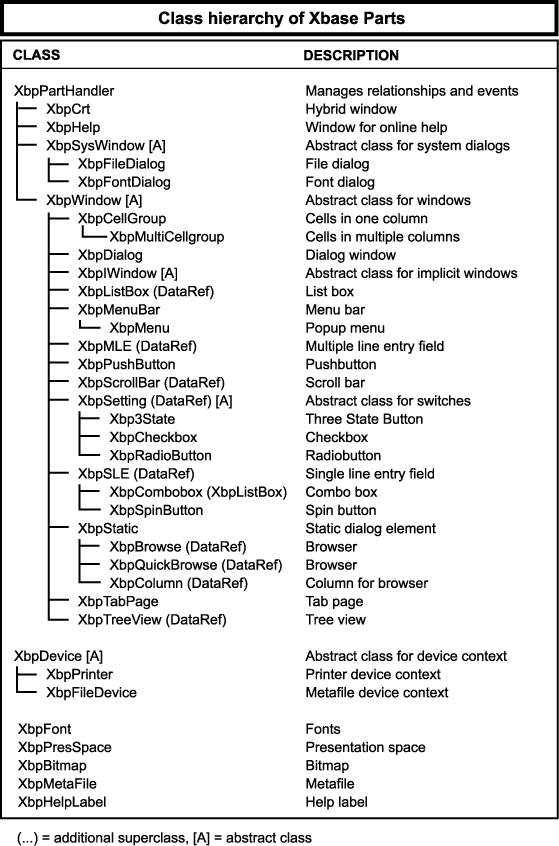
Class hierarchy of Xbase Parts
This section gives an overview of the class hierarchy of Xbase Parts. The relationship between different Xbase Parts is illustrated in the illustration below as well as which XBPs utilize the capabilities of another class. The classes marked with "[A]" are abstract classes which cannot themselves be instantiated on the Xbase++ language level. All Xbase Parts that have a visible representation are derived from the XbpPartHandler class. The XbpPartHandler class implements the parent-child relationship and defines the method :handleEvent().
DataRef() - The connection between XBP and DBE
In the class hierarchy of Xbase Parts, nine classes are derived not only from XbpPartHandler or XbpWindow but also from the DataRef class. The DataRef class provides objects that reference data. It provides data from either a memory variable or a field variable for use in an XBP. All Xbase Parts that can modify data also have DataRef as a superclass. The DataRef class provides services for accessing data. In the simplest case, this data is a value that only exists in the edit buffer of an Xbase Part and is changed there. The following Xbase Parts use an edit buffer for storing data:
Xbase-Parts derived from DataRef (XBPs with edit buffer)
| XBP | Data type in the edit buffer |
|---|---|
| XbpSLE | Unformatted character string (single line) |
| XbpMLE | Formatted character string (multiline) |
| Xbp3State | Numeric value (0, 1, 2) |
| XbpCheckBox | Logical value |
| XbpRadioButton | Logical value |
| XbpSpinButton | Numeric value (in the limits Min and Max) |
| XbpListBox | Array (numeric position of the selected entries) |
| XbpComboBox | Array and character string (special case) |
| XbpScrollBar | Numeric value (-2^15 to +2^15) |
Access to data stored in the edit buffer of an Xbase Part occurs in the method :getData() which is implemented in the DataRef class. :getData() returns the value in the edit buffer. In the following example, an entry field is created and after each keypress the current contents of the edit buffer are displayed:
#include "Appevent.ch"

PROCEDURE Main
   LOCAL nEvent, mp1, mp2, oXbp

   CLS                                   // This is an XbpCrt window

   // Create entry field
   oXbp:= XbpSLE():new()
   oXbp:create( , , {50,50}, {100,30} )
   oXbp:keyBoard := {|mp1, mp2, obj|;
       IIf( mp1== xbeK_ESC, ;            // Esc key was pressed
            PostAppEvent( xbeP_Close), ; // terminate program
            QOut( obj:getData() )    ) } // display buffer

   // Event loop
   nEvent := 0
   DO WHILE nEvent <> xbeP_Close
      nEvent := AppEvent( @mp1, @mp2, @oXbp )
      oXbp:HandleEvent( nEvent, mp1, mp2 )
   ENDDO
RETURN
In the example, the contents of the edit buffer of the XbpSLE object are read in the code block assigned to the :keyBoard callback slot. This code block is evaluated after each keypress and receives the XbpSLE object as the third parameter obj.
The example illustrates that managing and changing data in a program just requires Xbase Parts that include an edit buffer. The value to be edited is stored in this edit buffer. Generally, no other memory variable referencing the value is needed.
The DataRef class provides the instance variable :dataLink to link an Xbase Part to a database field in order to display or change field variables. A data code block that defines how to access a database field can be assigned to this instance variable. This data code block provides the connection between an Xbase Part, a field variable and DatabaseEngine. The following example uses an XbpSLE object to access a database field:
#include "Appevent.ch"

PROCEDURE Main
   LOCAL nEvent, mp1, mp2, oXbp, oSLE
   FIELD LASTNAME

   // open database (for exclusive access)
   USE Customer EXCLUSIVE

   // create entry field
   oSLE := XbpSLE():new()
   oSLE:create( ,, {50,100}, {100,30} )

   // reference database field
   oSLE:dataLink := {|x| IIf( x==NIL, LASTNAME, LASTNAME:=x ) }

   // copy database field into SLE
   oSLE:setData()

   // Pushbutton to cancel program
   oXbp := XbpPushButton():new()
   oXbp:caption := "Cancel"
   oXbp:create( , , {50,50}, {80,30} )
   oXbp:activate := {|| PostAppEvent( xbeP_Close ) }

   // Pushbutton to go to next record
   oXbp := XbpPushButton():new()
   oXbp:caption := "Next"
   oXbp:create( ,, {150,50}, {80,30} )
   oXbp:activate := {|| oSLE:getData(), ;  // write data
                        DbSkip( 1 )   , ;  // skip forwards
                        oSLE:setData()  }  // read new data

   // Pushbutton: go to previous record
   oXbp := XbpPushButton():new()
   oXbp:caption := "Previous"
   oXbp:create( ,, {250,50}, {80,30} )
   oXbp:activate := {|| oSLE:getData(), ;  // write data
                        DbSkip( -1 )  , ;  // skip backwards
                        oSLE:setData()  }  // read new data

   // Event loop
   nEvent := 0
   DO WHILE nEvent <> xbeP_Close
      nEvent := AppEvent( @mp1, @mp2, @oXbp )
      oXbp:HandleEvent( nEvent, mp1, mp2 )
   ENDDO
RETURN
The example is a little more complex because it creates three kinds of dialog elements: an XbpSLE object that can edit a database field, a pushbutton to cancel the program and two pushbuttons to perform database navigation. One of the most important elements in this example is the data code block assigned to the instance variable :dataLink. This code block defines access to the database field LASTNAME. This code block is executed within the methods :setData() and :getData() which are implemented in the DataRef class (the XbpSLE class also inherits from DataRef!). The method :setData() evaluates the data code block without passing a parameter to it and assigns the return value of the code block to the edit buffer of the XbpSLE object. In other words, the method :setData() reads the value of the database field LASTNAME and copies it into the edit buffer of the entry field. The method :getData() performs the reverse function: it reads the value from the edit buffer of the XbpSLE object and passes this value to the data code block in the instance variable :dataLink. An assignment to the field variable occurs within this data code block. :getData() reads the edit buffer of an Xbase Part and writes it into the database field via :dataLink.
In the example, two pushbuttons are programmed to provide navigation in the database. At any given time they can be used to select the next or previous record. This occurs in code blocks assigned to the :activate callback slots of the pushbuttons. In both code blocks the method :getData() is called before the record pointer is moved and :setData() is called after the DbSkip(). One of the special characteristics of an event driven GUI application is that the user controls the program execution. In the program itself it cannot be predicted when a particular pushbutton will be pushed or when input in the entry field will be performed. Due to this uncertainty, the current value in the edit buffer of the entry field must be written back into the database before the record pointer is moved. And in reverse, the contents of the database field must be copied into the edit buffer immediately after the pointer is moved.
In summary, the functionality of the DataRef class is used by all Xbase Parts that can edit data (all those that have an edit buffer). These XBPs are derived from both the XbpWindow and the DataRef classes. DataRef provides the mechanism for the connection between the XBP and variables (either field variables or memory variables). To create this connection, the DataRef class uses the code block :dataLink and the methods :setData() and :getData(). The DataRef class also provides methods that perform data validation (the :validate() method) or void changes made to the edit buffer (the :undo() method).
Feedback
If you see anything in the documentation that is not correct, does not match your experience with the particular feature or requires further clarification, please use this form to report a documentation issue.