Database Engines:pgdbe
Upsizing MDIDEMO Professional
This chapter comprises a step-by-step walkthrough of upsizing an existing DBF/NTX/CDX sample application (MDIDEMO) to the PostgreSQL server. In a second step, the upsized application is extended to make use of the full-text search capability provided by Postgres. Finally, performance considerations are discussed and applied to the application.
The MDIDEMO sample project
Xbase++ comes with various samples in the source\\samples folder. In this use case we will upsize the MDIDEMO sample application, which uses data access commands such as SEEK/GO/SKIP with DBF/NTX and DBF/CDX tables and indexes. The application relies heavily on record numbers as the primary key for search and navigation operations. Also, the application uses binary data such as images and unstructured textual data stored in memos.
Loading the project
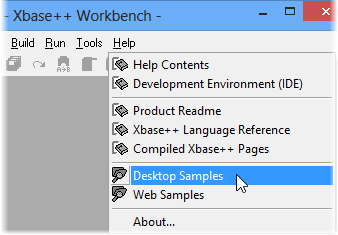
Start the Xbase++ Workbench from the Start menu or by typing xwb on the command line, and then select Help->Desktop Samples to open the samples folder.

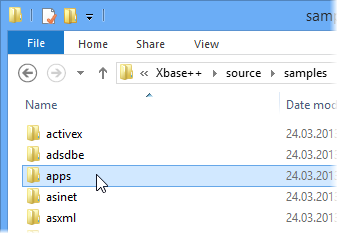
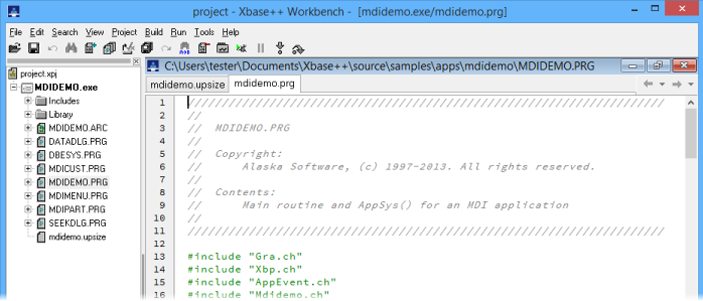
Navigate to apps\\mdidemo in the samples folder and open the Xbase++ project with a double-click on the project.xpj file. The Xbase++ Workbench will then load the project and provide you with an overview of the project in the left-hand pane.
Just hit Shift-F9 to execute the sample, and Ctrl-F9 for building it. Alternatively, the Build->Build Project and the Run->Execute mdidemo.exemenu items can be used.

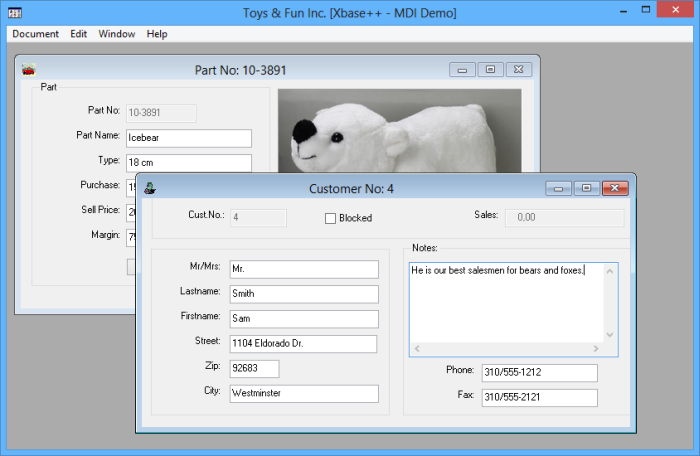
The MDIDEMO sample application in action
Upsizing your data
In the following chapters we will step-by-step upsize the data, from the MDIDEMO-specific DBF/NTX/CDX files to the PostgreSQL server.
Adapting mdidemo.upsize
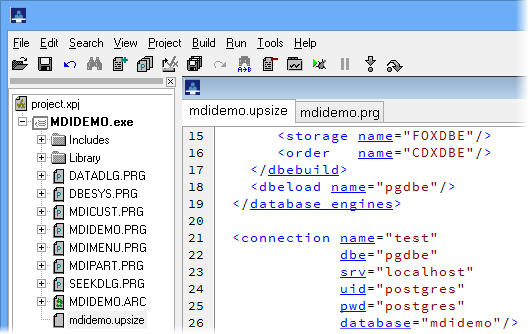
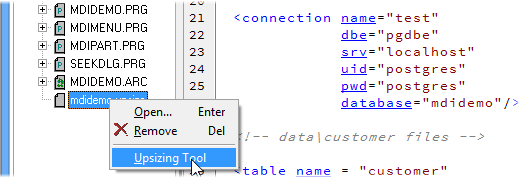
1 Double-click on the mdidemo.upsize file in the Project Manager of the Xbase++ Workbench. 2 Find the connection element in the editor which starts at line 21. This element defines the target of our upsizing process. Edit the 3 server (srv), 4 user name (uid) and 5 password (pwd) attributes according to the setup of your PostgreSQL server installation.
After you are done editing the mdidemo.upsize file, 6 save your changes using Ctrl-S or File->Save.
Running the Upsizing Tool
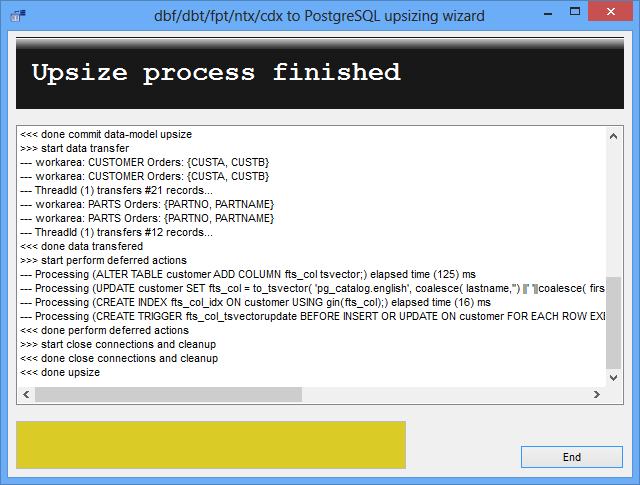
To start the upsizing process, 1 right-click on the mdidemo.upsize file in the Project Manager and 2 click on the Upsizing Tool entry in the pop-up menu. The Upsizing Tool will then start and verify your setup. If the tool fails to establish a connection to your PostgreSQL server, carefully review your edits in the connection element of the mdidemo.upsizedefinition file. If all is well, the Upsizing Tool should start the actual upsize process. When done, a success message should be displayed as shown below.

Verifying the data
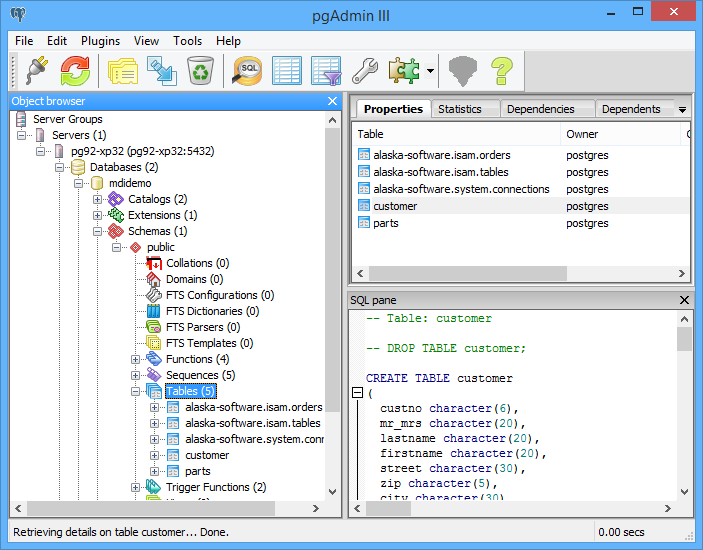
To verify the data, we use the Postgres Administrator Tool (PGAdmin) and select the MDIDEMO database to see which tables were created by the Upsizing Tool. At a minimum, there must be three meta tables which are required for ISAM emulation as well as the two DBF tables from the MDIDEMO sample.
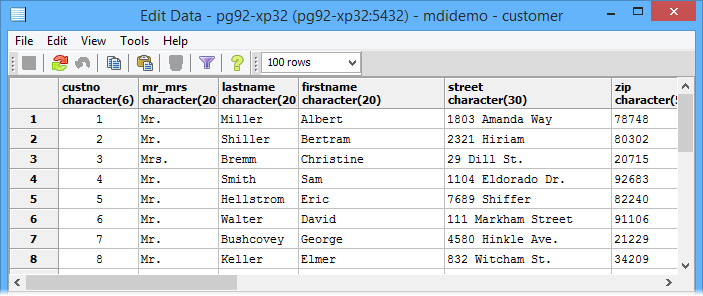
To view the data of a table, 1 right-click on the table node in the schema view and 2 click on Show data->Show first 100 rows.
Migrating your application
The sample using DBF tables
Migration of the MDIDEMO sample application is a straightforward task. First, the MDIDEMO project must be loaded into the Xbase++ Workbench. Just repeat the steps under "Loading the project" in the section "The MDIDEMO sample project" if needed.
Now simply execute the sample by hitting Shift-F9 or by clicking on Run->Execute. In the sample application, open a parts and a customer dialog by clicking on Documents->Parts and Documents->customers. In the customer dialog, enter some text into the Notes multi-line edit control, then click Edit->Save. By doing this, we have changed data in the DBF tables used by the MDIDEMO example. By default, the MDIDEMO uses the DBF tables and index files in the data\\misc folder installed with the examples.
Required code changes
The midemo sample is already prepared for using either the PostgreSQL server or DBF tables. The decision for which of the two storage and data access technologies is to be used is implemented via the USE_POSTGRESQL define. In the following, we will walk through all the required changes step by step.
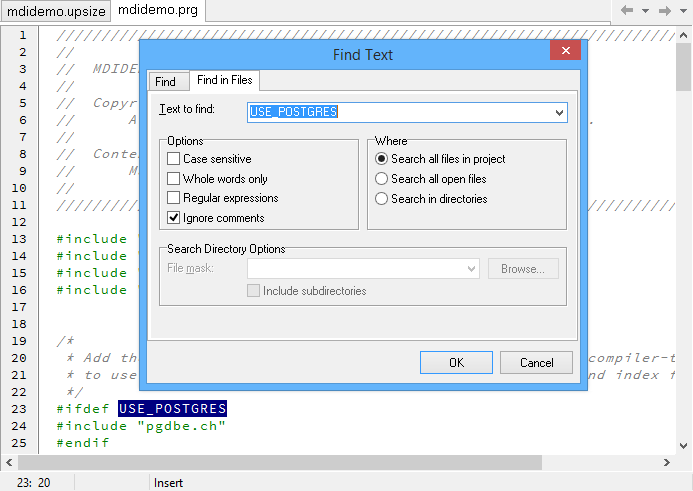
To create a work list of all the code changes, simply 1 double-click on the mdidemo.prg file in the Project Manager, then 2 double-click on the USE_POSTGRES define in line #23. Now hit 3 Ctrl-F and switch to the 4 "Find in Files" tab. 5 Select "Search all files in project" and click OK to start the search.
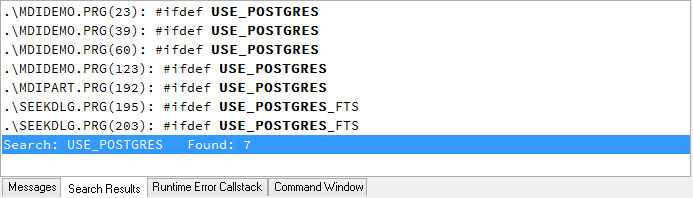
The result of the search is shown in the "Find Results" list of the Xbase++ Workbench. In the following chapters, a detailed explanation of all the code changes required to migrate the sample application to the PostgreSQL server is given.
mdidemo.prg(23) To use the PostgreSQL server, we need include the PGDBE.CH header file. This will implicitly add library requests for ADAC20B.LIB and PGUTIL.LIB.
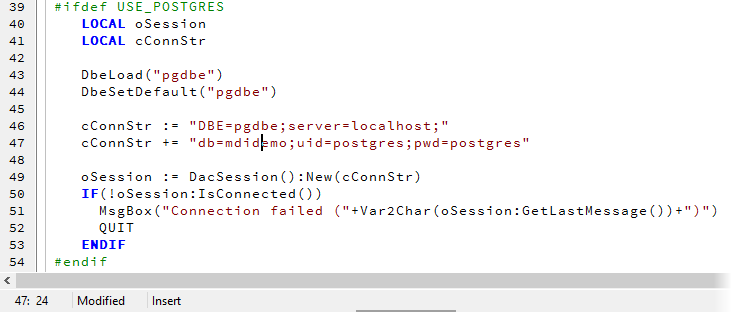
mdidemo.prg(39) The lines #39-#54 contain additional code required for loading the dbe and connecting to the PostgreSQL server. In line #43-#44, the PostgreSQL Database Engine is loaded and made the default dbe. In line #46-#47, the connection string is assembled which is then used in line #49 to establish a connection with the PostgreSQL server.
mdidemo.prg(60) These code changes deal with a typical case with file-based data: the File() function is used in the helper function AllFilesExist() for verifying that the required index files exist. If the indexes do not exist they are created. This coding pattern no longer works in a client/server setup, because there are no files anymore. The tables and indexes are now stored in a database managed by the PostgreSQL server. Of course, in the original code the existence of the table files (parts.dbf or customer.dbf) was not explicitly verified which generally should be done. Therefore, the code for verifying that a table exists was added in lines #62-#67. For this the new Table() function is used which works for local/remote DBF tables but also for remote SQL tables.
mdidemo.prg(123) As already mentioned, when using client/server databases we need to connect and disconnect from the server. Normally, the disconnect operation takes place before the application quits. Because no global variable is defined in our application which references the active session(s) and because we only have one connection, we can use the function DbSession() to retrieve the session from which to disconnect. DbSession() returns the active session of the current thread.
mdipart.prg(192) Sometimes the VIA clause is used in USE statements for opening a table with a specific Database Engine. After the migration however, we want to use the PostgreSQL Database Engine instead, which was defined as the default dbe above. This is why we simply remove the VIA clause. This way, the USE command uses the active connection to determine the Database Engine which is to be used.
seekdlg.prg(195+203) The code changes in these sections are related to full-text-search support and can be ignored for now.
Adapting the sample to make it work with the PostgreSQL server
The major code change required for making the MDIDEMO sample work with the PostgreSQL server was to add code for establishing a connection to the server, and for disconnecting when the application closes. Typically, this is done at application startup and shutdown. Connecting/disconnecting repeatedly to/from the server is not a good idea however, because establishing a connection is an expensive operation.
In order to allow the the MDIDEMO sample to connect, you need to change the connection string according to the setup of your PostgreSQL server. To do so, navigate to 1 mdidemo.prg line #64 and 2edit the server attribute by changing localhost to match your server name. Also 3 change the uid and 4 pwd attributes. Because you have already entered that data into your mdidemo.upsize definition, you can simply look there for the required details. Save your changes using Ctrl-S. Notice that the token "modified" in the lower-left of the edit window will go away then.
Rebuilding and running the sample
After changing the connection string, we also need to set the define USE_POSTGRES and to recompile the entire project. This will compile the code sections surrounded by #ifdef USE_POSTGRES into the application.
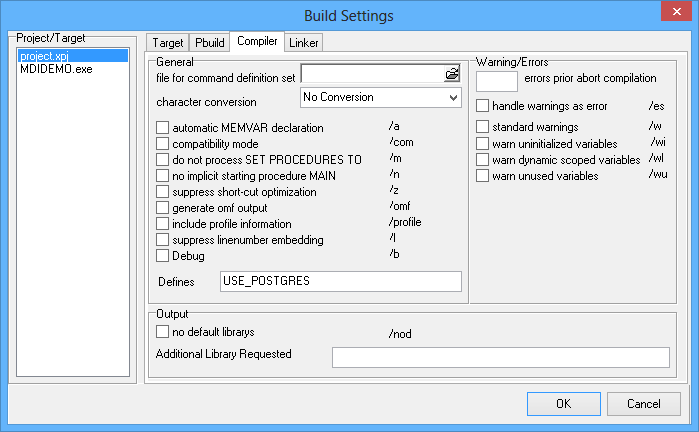
To set the define for the MDIDEMO project, 1 first navigate to line #39 in mdidemo.prg, 2 double click-on the USE_POSTGRES define, then 3 hit Ctrl-C to copy that string. Now open the project settings by 4 pressing Shift-Ctrl-F11 or by clicking on Project->Settings in the menu bar. 5 Now navigate to the Compile tab and 6 paste (Ctrl-V) the define into the Defines entry field.
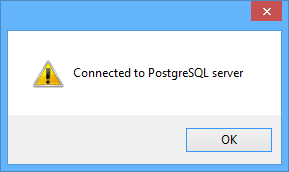
Finally, 7 click OK followed by Build->Rebuild Project to start a complete rebuild of the project. This is required because we added a define. After a short time the build should be finished, and you can now start the MDIDEMO using Shift-F9 or the Run->Execute item in the menu bar. The MDIDEMO should now start and connect to your PostgreSQL server. If this was successful, the following message box will appear:
Click OK and 1 open Documents->Parts and Document->Customers to access the data on the PostgreSQL server which you already have migrated as outlined in the "Upsizing your data" chapter. You should be able to navigate, and perform a seek which means all of your existing navigational code now works with an SQL DBMS. Of course, your latest changes (adding some text to the memo) are not visible. This is because we changed the data in the DBF table after the upsizing took place. But that is no problem! Just close the MDIDEMO and run the upsizing process again.
To do so, simply 1 right-click on the mdidemo.upsize file in the Project Manager and 2 click on Upsizing Tool in the popup menu. After the Upsizing Tool has finished, simply start MDIDEMO using 3 Shift-F9or Run->Execute. Open 4 Documents->Customers and check whether your changes are now visible.
Adding full-text search
The PostgreSQL DBMS comes with a fairly large number of new features. These are made available to you by the PostgreSQL Database Engine in a manner allowing you to utilize these features without having to rewrite all of your code. In this section, you will learn how to add full-text search to your existing Xbase++ solution and how to leverage that feature using navigational (ISAM) and relational (SQL) commands.
Full-text search explained
Full-text search is a linguistic search against text data in full-text indexes operating on words of a particular language. The search is linguistic because a search for the term "vary" returns hits for both "varies" and "vary", for example. Of course, the same could be achieved by using WHERE lastname LIKE "var%" in a SELECT statement. However, using LIKE is multiple times slower compared to using a full-text search index. Furthermore, you have to merge multiple fields of your table into a single index.
The MDIDEMO sample is already prepared to do full-text searches with the following characteristics.
Searching in lastname, firstname, city and notes with a single search entry
Automatic resolution of multiple search terms
Linguistic full-text search
Result handling based on record numbers
Automatic full-text search index creation and maintenance
Compiling MDIDEMO with full-text search
Load the MDIDEMO project into the Workbench and 1 double-click on the seekdlg.prg, 2go to line #195 using Ctrl-G. The following two code sections in lines #195-#197 and #203-#229 are the only changes required for using full-text search (fts).
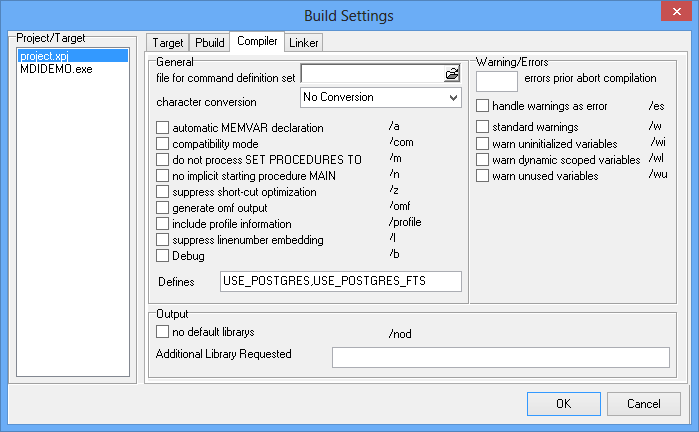
To enable fts in the MDIDEMO, simply 1 double-click on the USE_POSTGRES_FTS define and 2 hit Ctrl-C to copy this token into the clipboard. Then 3 open the Project Settings dialog with Ctrl-Shift-F11 and navigate to the Compiler tab. In the Compiler tab, 4 add a comma to the Defines entry field, 5 paste the token from the clipboard into the defines settings and 6 press OK. Finally, make sure the project is rebuilt by left-clicking on 7 Build->Rebuild Project.
Using full-text-search
Now let's see how fts works in action. Start MDIDEMO using 1 Run->Execute mdidemo.exe, 2 open Documents->Customer and 3 click on Edit->Seek.
In the Seek entry field enter "Smith" or "smith" and hit RETURN. You will get two hits because there are two "Smiths" in the table. Namely "Sam Smith" and "Rainer Smith".
Now enter "George" and hit RETURN. Again, two "Georges" are returned, "George Leinenkein" and "George Bushcovey". However, this time we found them based on their first names.
Fortunately, we know that the "George" we are looking for lives in Baltimore, so we enter "George Baltimore" and voila, the search returns "George Bushcovey".
In addition to city, first and lastname, the search can also include any information from the notes field. So we enter "smith bears" into the search field, and find "Sam Smith". He is our top salesman when it comes to bears - at least according to the notes entry.
As you can see, by using full-text search we have simplified the seek process in such a way that we no longer need to select a specific index or add additional filters. Instead the end user is totally free to enter the information he or she knows, and the application will respond with search results best matching the criteria.
Implementation
SQL statements need to be used to perform a full-text search. But thanks to Xbase++ and its unique ability to mix navigational and relational data access, we can execute an SQL SELECT and use the record number to perform subsequent GOTOs.
SELECT *,__record FROM customer WHERE fts_Col @@ plainto_tsquery(::SearchTerm)
The above SQL SELECT statement uses the PostgreSQL @@ operator to express the full text search comparison. Since this is a proprietary operator not known to Universal-SQL we need to use SQL Pass-Through. For the complete code example about how to use SQL Pass-Through with parameters, see seekdlg.prg line #210 and the following code. See also the SQLStatement() class documentation.
By using the following SQL statement we can perform partial full text search for a single term. If we want more than one term we may need to use the logical OR operator in the WHERE clause of our statement.
SELECT *,__record FROM customer WHERE fts_col @@ to_tsquery('::SearchTerm:*')
Behind the scenes
Full-text search would be super slow without a special data type and index implementation for creating/managing full-text-indexes. A full-text index is generally based on transformed character data stored in a dedicated field which is then used to perform the search operation. The transformation or normalization process includes processing strings into tokens and processing tokens into generalized forms so that different forms of the same word are made alike. In addition, so-called stop words such as "is", "he" or "should", are removed based on stem lists and grammatical rules that are applied to remove conjunctions. The normalization process is supported by a dictionary which defines stop words, synonyms and phrases using a thesaurus and much more. Finally, the transformed string is stored in a dedicated field in a format optimized for searching and ranking. The PostgreSQL data type representing that format is named "tsvector" (text search vector).
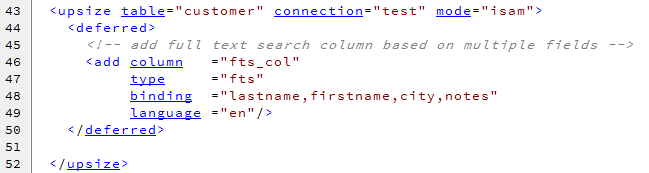
In order to create a full-text searchable field and its related index, the Xbase++ Upsizing Tool supports a special data type "fts", which can be used in a deferred action of an upsize definition. The following code is an excerpt from the mdidemo.upsize file which creates a field "fts_col" for storing the transformed textual data from the lastname, firstname, city and notes fields of the customer table.
The deferred action creating a full-text search index does a number of things on behalf of the SQL server:
Alters the table to add a field "fts_col" with the "tsvector" data type.
Executes an UPDATE statement for storing the transformed textual data from the fields listed in the binding clause into "fts_col".
Creates a GIST index for the "fts_col" field.
Creates a trigger to automatically maintain the "fts_col" data if changes occur in one of the bound fields (lastname, firstname, city, notes).
Summary
In this section you have learned how easy it is to add full-text search capabilities to an existing application. Also you have seen that using full-text search can greatly simplify the search experience while making it more flexible at the same time, both of which will make life easier for your end users. Generally, integrating full-text is beneficial for the following reasons:
Hundreds of times faster than LIKE
A single search is able to "look" into several fields of your table
Linguistic search often yields more and better results
Feedback
If you see anything in the documentation that is not correct, does not match your experience with the particular feature or requires further clarification, please use this form to report a documentation issue.